
Using Nodes for Shading in Blender: A Practical Guide
Learn how to use nodes for shading in Blender with tips on Principled BSDF, texture color spaces, and Cycles vs Eevee differences.
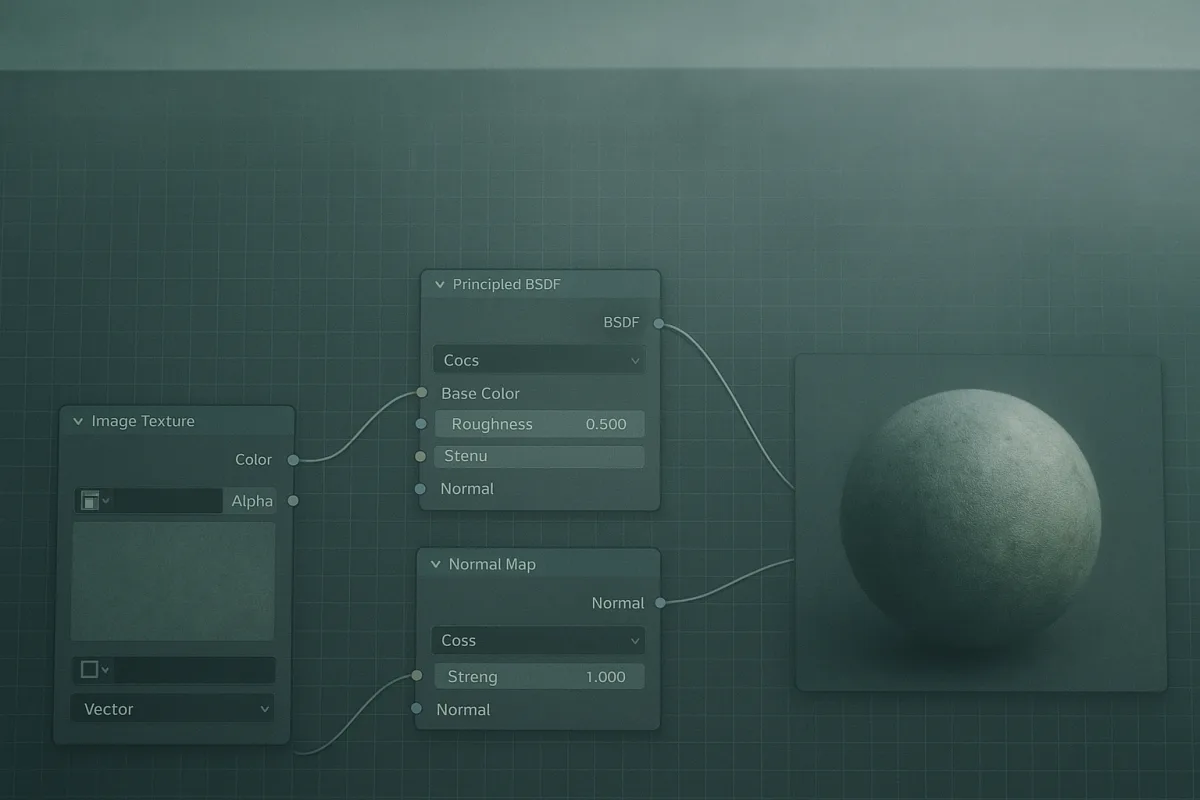
Start with the material, not an impressive node graph
In Blender 4.x, open the Shader Editor only after the object has a material assigned. This sounds elementary, but an unassigned material is one of the most common reasons a carefully built graph appears to do nothing. [1]
The basic material graph is deliberately small: Principled BSDF feeds Material Output. Principled is the useful default because it gathers the controls required for many everyday surfaces in one node, rather than making you assemble a material from separate diffuse, glossy and transmission shaders. [1]
That does not mean every material should become an elaborate Principled setup. It means you have a dependable baseline. Get a believable response from base color, metallic and roughness first, before adding masks, noise, normal detail or displacement.
I teach this as a diagnostic habit, not a hard rule. If you add six texture inputs before checking the base response, you cannot tell whether the problem is wrong roughness, a bad normal map, a missing UV layout or simply unhelpful lighting.
For a simple painted plastic, leave Metallic at 0 and establish the surface with Base Color and Roughness. For metal, set Metallic to 1.0, then control whether it reads as polished, brushed or weathered with roughness variation. [1]
A reflective metal with perfectly uniform roughness often looks synthetic because real use introduces fingerprints, abrasion, oxidation and directional wear. That variation can come from a roughness image, procedural noise, or a mix of both, depending on the asset.
Learn what the shader is actually asking for
The most productive way to master nodes is to think in material questions rather than node names. Ask: what determines the object’s color, reflectivity, microscopic surface breakup, transparency, and silhouette? Then build only the connections needed to answer those questions.
Base Color is pigment or albedo, not a place to paint fake highlights and deep shadows. If an image already contains strong directional lighting, it will fight the lighting you create in the scene and make the object harder to match.
Roughness controls the spread of reflections. Low roughness produces tighter, sharper reflections, while high roughness broadens and softens them. For many materials, roughness carries more of the realism than adding extra geometry or chasing a very detailed color map.
Metallic tells the Principled shader whether a surface behaves like a metal or a dielectric material such as paint, wood, rubber or ceramic. In a standard PBR workflow, it is generally a mask, not a slider to leave halfway without a material reason. [1]
The older Diffuse BSDF, Glossy BSDF, Emission and Mix Shader nodes remain useful because they make individual light paths easier to isolate. [1] A Mix Shader can combine two distinct material behaviours through a mask, such as a clean paint layer and exposed metal beneath it.
Use Emission when the surface itself should contribute visible light, such as a screen, indicator or stylised luminous material. Do not use it merely to rescue an underlit scene. If the material should respond to the world’s lighting, solve the lighting first.
Choose Cycles or Eevee before you rely on special nodes
Blender’s node editor looks shared, but Cycles and Eevee are not identical renderers. That matters most when you move beyond Principled and expect a node graph to work unchanged in both engines. [12]
The Principled Hair BSDF and Hair BSDF are Cycles-only nodes. If your character hair or groom needs those specific shaders, plan to render it in Cycles rather than discovering the limitation after the look-development pass. [12]
Conversely, Eevee has nodes including Shader to RGB and Specular BSDF that are not available in Cycles. Shader to RGB is particularly relevant to stylised work because it can turn a shader result into colors that can be manipulated further in the graph. [12]
This is not an argument that one renderer is universally superior. Pick based on delivery requirements. A fast stylised Eevee material and a physically motivated Cycles material can be equally appropriate, but they may need different graphs to achieve their intended result.
Name the engine in your material notes or asset documentation. A material labelled “glass” tells the next artist very little. “Cycles glass, Blender 4.x, transmission-based” tells them where to begin when the asset renders differently in another file.
Bring in image textures without corrupting the data
Once the plain shader reads correctly, connect image maps. The crucial distinction is whether the image represents visible color or numerical data. Blender’s Image Texture node needs the right color-space setting for each. [2][4]
Base-color maps should use sRGB, because they are intended to be interpreted as visible color. Roughness, metallic, normal and displacement maps should use Non-Color, because Blender must read their pixel values as data rather than transform them as display color. [2][4]
This is not a cosmetic checkbox. A roughness map read as color can produce the wrong reflectivity. A normal map interpreted incorrectly can shade with unexpected strength or direction. The material may seem vaguely wrong even though every node appears connected. [4]
If a texture fails to appear at all, check UVs before rebuilding the graph. Image textures need a coordinate system. A UV map is usually the practical choice for a painted asset, while generated or object coordinates can suit a procedural material. [1]
The Texture Coordinate node supplies coordinate sources, and the Mapping node lets you adjust position, rotation and scale before those coordinates reach a procedural texture. [1] This pair is worth understanding because it prevents a common problem: inconsistent texture scale between objects.
For a set of props, use a consistent coordinate strategy. If each object receives an arbitrary Noise Texture scale, the wood grain, dirt or surface pitting can look physically unrelated. That is a look-development problem, not simply a node-editor problem.
Handle normal, bump and displacement as separate jobs
Normal, bump and displacement are related tools, but they do not produce the same result. Treating them as interchangeable is a reliable route to surfaces that look acceptable in one camera angle and fail in another. [5]
A normal map alters shading direction without changing the mesh. In Blender 4.x, connect the image texture to a Normal Map node, then connect the Normal Map output to the Principled BSDF Normal input. Set the normal image to Non-Color. [2][3]
Do not plug the normal image directly into Principled’s Normal socket. The Normal Map node interprets the map correctly and provides strength control. If a surface looks inverted or overly embossed, first verify the map format and its settings rather than stacking more effects on top. [3][4]
Bump also creates shading-only relief, normally from grayscale height information. It is useful for fine grain, pores and subtle manufacturing texture that does not need to affect the silhouette. [5]
Displacement actually moves geometry, which means the mesh needs enough subdivision to show it. A displacement map on a low-density mesh cannot create convincing raised mortar, chipped edges or sculptural relief because there are too few vertices to move. [5]
Use true displacement where the profile must change in close-up. Use normal or bump where the detail is too fine to justify extra geometry. That division saves memory and render cost while keeping visual effort where the camera can see it. [5]
Build procedural variation when it solves a real problem
Noise, Musgrave and Voronoi textures are core procedural building blocks in Blender’s Shader Editor. [1] They are useful because they produce scalable patterns without relying on a fixed-resolution bitmap, making them practical for broad surfaces and reusable materials.
Use Noise for soft, irregular breakup: roughness variation in plastic, faint discoloration in plaster, or non-uniform clearcoat wear. Use Voronoi where you need cell-like patterns, including stylised stone, cracking foundations or controlled spot masks. [1]
Procedural cobblestone and other repeated surface patterns can also be built with geometry-node workflows when the stones require actual geometry rather than only a shading illusion. [6][8] That is a different decision from adding a procedural color pattern in the Shader Editor.
The boundary is simple: if a pattern needs a changing silhouette, shadowing between pieces or believable close-up gaps, consider geometry. If it only needs surface variation, a shader is often cheaper and easier to art-direct.
Procedural does not automatically mean photoreal. Blender Studio’s training material positions procedural texturing as a flexible method for variation, but image textures still have the advantage when you need photographed imperfections, a particular hand-painted style or identifiable surface history. [13]
A practical hybrid is often strongest: use image maps for the asset-specific information, then multiply or mix procedural variation into roughness, color breakup or masks. That avoids the cloned look that can result when every prop uses the same texture unchanged.
Keep the graph fast enough to work with
Complex node trees can reduce viewport responsiveness and increase render time, but there is no universal node-count threshold. The impact depends on hardware, resolution, texture size, render engine and the rest of the scene. [11]
That uncertainty is why you should test incrementally. Add one layer of variation, look at the material under the intended lighting, and judge whether it makes a visible contribution. Do not assume complexity equals quality.
Large image maps should match the asset’s role. Use 4K or 8K textures where a hero object will fill the frame, while 1K or 2K maps are generally more appropriate for background objects. [1] A distant crate rarely benefits from an 8K roughness map.
When a procedural network becomes expensive but the result no longer needs to remain editable, baking it to image maps is a sensible option. Reusing node groups can also keep repeated materials consistent and easier to update. [11]
Avoid generating large amounts of geometry prematurely. Geometry Nodes can be powerful for repeated details, but excessive instancing or geometry generation can make iteration slower before you know whether the detail survives at the final camera distance. [8]
Debug materials in a fixed order
When a material is wrong, do not pull random sliders. First confirm the object has the intended material assigned. Then confirm the active render engine supports the nodes you used. These two checks eliminate many apparently mysterious failures. [1][12]
Next, temporarily disconnect maps and return to a plain Principled BSDF. If the plain material works, reconnect Base Color, then roughness, metallic, normal and displacement one at a time. This isolates the map or connection that changed the result.
Check every map’s color space during that reconnect process. Base color should be sRGB, while normal, roughness, metallic and displacement data should be Non-Color. [2][4] Then check whether image-driven maps have valid UVs.
Finally, judge the shader under usable lighting. A metal needs something meaningful to reflect, glass needs background contrast, and subtle roughness variation disappears under flat illumination. Nodes define material behaviour, but lighting reveals whether that behaviour reads.
Frequently Asked Questions
How do I start shading with nodes in Blender?
Begin by assigning a material to your object, then open the Shader Editor. Start with a simple node setup: connect a Principled BSDF node directly to the Material Output node. Adjust one property at a time—such as base color, metallic, or roughness—to understand each parameter’s effect before adding more complexity.
What is the role of Principled BSDF in Blender shading?
The Principled BSDF node serves as a versatile, all-in-one shader that consolidates controls for many common surface types like plastic, metal, and skin. It provides a reliable baseline by combining diffuse, glossy, and transmission properties, allowing you to create realistic materials without assembling multiple separate shaders.
How to correctly set color space for textures in Blender nodes?
Set base color (albedo) textures to use sRGB color space because they represent visible pigments. For data maps such as roughness, metallic, normal, and displacement textures, use Non-Color data to avoid incorrect color management and ensure accurate shading results.
What are the differences between Cycles and Eevee nodes in Blender?
Cycles and Eevee use different rendering engines, so some shader nodes are engine-specific. For example, Principled Hair BSDF and Hair BSDF nodes are only available in Cycles, while Eevee supports nodes like Shader to RGB and Specular BSDF that Cycles does not. Therefore, node setups must be tailored to the renderer you plan to use.
How do I use normal maps properly in Blender's shader editor?
Always pass normal map images through a Normal Map node before connecting them to the Normal input of the Principled BSDF shader. Connecting a normal map image texture directly to the Normal input is a common mistake that leads to incorrect shading.
How we researched this
This article was assembled from 13 cited references.
Nothing here is based on hands-on testing. Where a figure or finding appears, it belongs to the source cited beside it, and the writing says so rather than implying otherwise. Every source is listed below so you can check it.
Sources
- Blender Shader Editor Explained: Understanding Nodes, Materials, and PBR Workflows - CGVista Resources
- Normal Map for Blender Guide | Normal Map Maker
- How to Set Up a Normal Map in Blender 4.x Guide | NormalMap.ai
- Blender Normal Map Color Space and Strength | AITextured
- Displacement, Normal, and Bump Maps Are Not Interchangeable — Here's How to Use Each One Right — BlenderCG
- Make Procedural Cobblestone Using Geo Nodes - BlenderNation
- How to Use Procedural Texturing in Blender for Beginners - Toxigon
- Blender Geometry Nodes: Beginner Guide, Examples & Workflow
- Introduction - Blender 5.1 Manual
- Blender Shader Editor Guide: Creating Materials - blender
- Nodes & Physics - Blender Developer Documentation
- Do nodes in EEVEE work the same as in Cycles? - Blender Stack Exchange
- Blender Studio
Related Articles
How to Bake Textures in Blender: A Practical Guide
Learn how to bake textures in Blender with tips on UVs, resolution, and Cycles baking for game-ready assets and efficient workflows.
Realistic Water in Blender
Learn the best techniques for creating realistic water in Blender using Ocean Modifier, fluid sims, and layered shading for stunning results.

Create Realistic Sky in Blender
Learn how to create a realistic sky in Blender using procedural textures, HDRIs, and sun direction for believable outdoor lighting.
Best Lighting Techniques for Blender Rendering
Discover the best lighting techniques for Blender rendering using Cycles and Eevee to create realistic, well-shaped 3D models.