
Blender Tips for Creating Landscapes
Learn Blender tips for creating landscapes, including sculpting, resolution management, and using Geometry Nodes for natural detail.
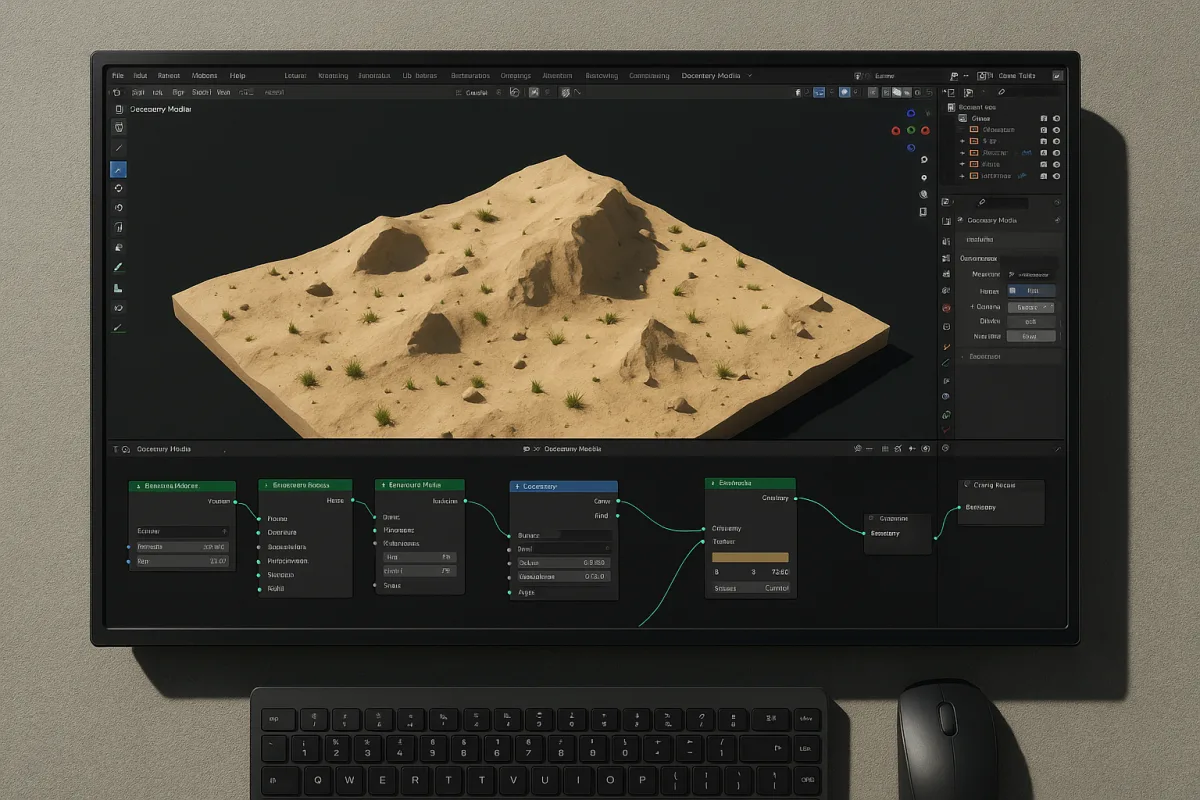
Think of a landscape as a resolution hierarchy
The most useful tip for environmental modelling is not a brush, add-on or render setting. It is deciding where resolution belongs. A convincing landscape is built in layers of scale, and each layer has a different job.
At the largest scale, terrain establishes the silhouette: ridge lines, valleys, plateaus, river cuts and the general slope beneath the camera. At middle scale, erosion, shelves, gullies and boulder fields explain how that terrain might have formed.
The smallest scale supplies evidence of material. Pebbles, grass clumps, cracks, moss, leaf litter and noisy roughness make a surface readable. They are important, but they cannot repair a hill whose silhouette feels like a soft lump.
This is easy to lose sight of in Blender 5.2 because sculpting gives immediate visual feedback. A few passes with a detailed brush can make bare terrain look busy, even when its major contours remain unconvincing.
I teach this as a resolution budget. Spend polygons, texture pixels, scatter instances and render memory closest to the camera and on features that affect the silhouette. Spend much less on surfaces that will only occupy a few pixels.
That principle is not a rule demanding rigid numbers. Camera movement, delivery resolution, game engine constraints and art direction all change the answer. Still, a hierarchy is more dependable than treating every square metre of ground as a hero asset.
Start with forms that survive a thumbnail
In Blender 5.2, I would begin terrain from a deliberately simple mesh, then use the Subdivision Surface, Displace and Remesh modifiers according to the shape problem. These are complementary tools, not three mandatory steps. [16]
Subdivision Surface gives a low-resolution base enough smooth curvature to sculpt into. A Displace modifier can establish broad, repeatable variation from a texture. Remesh is useful when a terrain edit has stretched faces into awkward, uneven topology.
The important distinction is that displacement produces surface variation, while sculpting defines intentional landform. Noise can suggest weathering, but it does not know where a drainage channel should turn or where a slope should flatten into a meadow.
A.N.T. Landscape, included in Blender’s documented toolset, is a sensible starting point when you need a generated terrain mesh rather than an empty plane. [17] It suits blocking a location quickly, provided you treat its output as a starting hypothesis.
Similarly, Erosion add-ons can help introduce drainage-like breakup, and community projects show erosion simulations used as part of Geometry Nodes terrain workflows. [5] Their result is not automatically realistic, because scale, material and camera framing still need artistic judgement.
At this stage, use the Draw brush for broad elevation changes and Clay Strips for building or shaving planar masses. Crease is better saved for selected cuts, cliff seams or compressed channels rather than dragged across the whole landscape. [1]
A useful check is to view the work from the final camera, then reduce it to a small preview. If the valley, ridge or horizon becomes unreadable, adding stones and grass is spending detail in the wrong place.
Why dense terrain becomes difficult to sculpt
Landscape sculpting often slows down because the mesh is carrying small-scale information before its large-scale shape is settled. Every additional polygon increases the amount of geometry Blender must update while a brush is moving.
That work is chiefly constrained by CPU processing and available RAM, not simply graphics-card power. The warning that polygon count, rather than a new GPU, commonly kills sculpt responsiveness is well founded. [11]
This matters because a giant terrain can tempt an artist into subdividing early. The viewport looks smoother, but brush strokes become sluggish, decisions take longer, and the mesh stores detail that may never be visible in the render.
For a working baseline in Blender 5.2, a viewport Subdivision Surface level around 2 keeps a terrain reasonably responsive, while a render level around 3 can provide extra smoothness where it is genuinely needed. [16]
Those levels are a practical starting habit, not a universal prescription. There is no reliable, source-backed polygon count that fits every landscape scale, machine or final output. A close-up muddy riverbank and a distant mountain need radically different budgets.
Dynamic Topology, usually called Dyntopo, handles this by adding detail where a sculpt stroke needs it. It is valuable for a specific cliff fracture or cut bank, but indiscriminate use can leave a difficult, unevenly dense mesh. [1]
Multiresolution takes a different approach. It retains a structured base mesh and adds higher levels for progressively finer work, which makes it well suited to returning from a detailed pass to adjust the underlying terrain shape. [1]
For a long production landscape, I would choose Multiresolution when the ground must remain editable across several scales. I would choose Dyntopo for local, irregular sculpting where clean quad flow is less important than freely placed detail.
This is also where ZBrush can be the more comfortable sculpting tool for an extremely high-density terrain study, while Blender handles assembly, scattering and rendering. Nomad Sculpt can serve the same early-form role on a tablet. Neither removes the need for a low-resolution plan.
Geometry Nodes should distribute detail, not replace design
Once the terrain silhouette and medium-scale erosion work, procedural scattering becomes valuable. In Blender 5.2, Geometry Nodes can distribute rocks, vegetation and other repeated assets according to masks, slope, height and randomness. [4][18]
That is a better use of computation than manually placing hundreds of nearly identical stones. Blender Studio’s Rock Generator example demonstrates the logic of making a reusable rock system, rather than modelling every scattered object as a unique asset. [18]
The key is to make scatter respond to the terrain’s story. Rocks can collect beneath a cliff, thin out across exposed grass, and vary with slope. Vegetation can avoid bare erosion channels and become denser where moisture plausibly gathers.
Random distribution alone rarely communicates that logic. Uniformly scattered assets reveal the tool rather than the environment, particularly when every instance shares the same scale, rotation, material roughness and contact with the ground.
Use a small set of variations, then let masks control their placement. A few purposeful boulders placed by hand near the camera are often more valuable than thousands of procedurally scattered objects in the distance.
There is no comprehensive benchmark showing that Geometry Nodes is always faster or more realistic than manual environmental modelling. Its advantage is repeatability and controllable variation, not a guarantee of better art. [4][18]
Houdini is worth considering when a project needs large, evolving procedural systems or simulation-led terrain generation. For a hard-surface ruin, Plasticity may be a more direct modelling choice before the asset returns to Blender for placement and look development.
Texture pixels are part of the same budget
Geometry alone does not determine terrain fidelity. Texture resolution must follow camera importance too, otherwise a scene trades sculpt lag for texture-memory pressure. High-resolution textures can increase loading time and memory use without improving the final image. [3]
A useful guide is roughly 1024 texels per metre for hero assets, commonly corresponding to 2K to 4K maps. Mid-ground assets can work around 256 to 512 texels per metre, often with 1K to 2K textures. [3]
Background terrain needs less again, especially if atmospheric perspective and depth of field will soften it. The point is consistent texel density: a nearby rock should not have crisp pores while adjacent ground turns into a visibly enlarged texture. [3]
This also changes how you make terrain materials. A 4K scanned mud texture may suit a foreground bank, but it is not automatically the right texture for an entire landscape. Blend it with lower-frequency colour and roughness variation across the broader terrain.
Substance 3D Painter or Substance 3D Designer can be useful where a project needs authored masks, layered material logic or tileable ground surfaces. Blender’s shader tools can assemble those maps effectively, while Marmoset Toolbag may be useful for quick asset presentation rather than whole-scene landscape assembly.
For autumn look development, shift foliage albedo toward seasonal yellows, ochres and reds, then support it with warmer lighting and softer shadows. Mist or other volumetrics can reinforce depth, though the exact balance is an artistic decision rather than a formula. [15]
Do not try to create autumn by pushing every green texture toward orange. Seasonal variation reads more convincingly when some vegetation remains muted, ground cover changes separately from trees, and the scene retains cooler shadow information.
Light the scale, not just the sky
Outdoor HDRIs are another form of resolution budgeting. An HDRI used only to light a scene generally needs about 4K to 8K resolution, while a map visible directly in the frame may need up to 20K. [7][9]
The more consequential quality is the sun disc. An HDRI with an unclipped sun disc provides a concentrated bright source that can cast convincing directional shadows. A broadly bright, clipped map tends to produce flatter, less legible light. [7][9]
In Blender 5.2, set the world material to use an Environment Texture feeding a Background shader, then judge it from the camera. Rotate the HDRI to establish the shadow direction before changing exposure or adding extra lights.
A clear-sky HDRI can be useful for a clean daylight study, including the clear-blue-sky category available through BlenderKit. [8] But a pleasant sky thumbnail is not proof that its sun intensity, contrast range or horizon detail suits your scene.
Use the HDRI first to establish believable ambient light and broad shadow direction. Add a Sun light only when you need art-directable control, and make sure its angle agrees with the apparent solar direction in the environment map.
The final test is simple: remove the close-up scatter, reduce texture detail temporarily, and render the landscape. If it still reads as a place with a coherent scale, the resolution budget is doing its job.
Frequently Asked Questions
How do I optimize sculpting performance for landscapes in Blender?
Sculpting performance is mostly limited by CPU and RAM rather than GPU power. To optimize responsiveness, keep the terrain mesh at low resolution until its large-scale silhouette is established. Avoid subdividing too early or adding small-scale detail before settling broad landforms, and use a viewport Subdivision Surface level around 2 for a good balance of smoothness and speed.
What is the best way to build landscape detail in Blender?
Build landscape detail as a hierarchy based on camera distance: start with broad landforms to define the silhouette, add medium-scale erosion features next, and finally apply small details like rocks and grass. Use manual sculpting for large forms and rely on procedural tools like Geometry Nodes for repeated small elements to maintain efficiency and scale readability.
How can Geometry Nodes help in creating landscapes in Blender?
Geometry Nodes are effective for adding repeated details such as stones and vegetation across a landscape. They allow procedural scattering and variation, which saves time compared to manual placement. However, large-scale terrain shaping and defining major landforms should still be done through sculpting for artistic control.
How should I manage mesh resolution when sculpting landscapes in Blender?
Start with a simple, low-resolution mesh and use modifiers like Subdivision Surface, Displace, and Remesh to shape terrain progressively. Keep mesh density matched to the level of detail needed: higher resolution near the camera and lower resolution for distant terrain. Avoid carrying small-scale detail on a dense mesh before the major landform shapes are finalized to maintain sculpting responsiveness.
What are effective lighting tips for 3D landscapes in Blender?
Choose HDRI environment maps primarily for their lighting quality, especially those with an unclipped sun disc to produce realistic shadows. The resolution of the HDRI should be appropriate for the scene—typically 4K to 8K for lighting purposes—to ensure natural illumination without excessive memory use.
How we researched this
This article was assembled from 18 cited references.
Nothing here is based on hands-on testing. Where a figure or finding appears, it belongs to the source cited beside it, and the writing says so rather than implying otherwise. Every source is listed below so you can check it.
Sources
- Sculpting | Blender for Visual Investigation
- 6 of the Best Add-ons for Blender in 2026: Which One Do You Need?
- Model Texturing: Complete Guide for 3D Artists | Saved Pixel
- Advanced Geometry Nodes in Blender 5.2: Scattering
- Geometry node landscape with erosion simulation - Finished Projects - Blender Artists Community
- World Blender | BlendAtlas
- HDRI Lighting in Blender: Image-Based Lighting for Realistic Scenes - Blog - CGI Academy Hub
- Clear Blue Sky HDRI | Landscapes HDRis | BlenderKit
- How to use an HDRI for lighting in Blender | HDRI Knight
- HDRI for Blender: World Node Setup, 161 Skies | HDRI Hub
- Polygon Count Is Killing Your Sculpt Session — And Buying a New GPU Won't Fix It — BlenderCG
- Common Mistakes in Blender Modeling
- How to create cinematic environments in Blender - Toxigon
- 7 Critical Mistakes in Real-Time Rendering and Their Solutions - DarkCore
- Create a Stunning Autumn Landscape in Blender - BlenderNation
- Subdivision Surface Modifier, Meshes glätten in Blender — Wiki | Lazi Akademie
- ANT Landscape — Blender Manual
- Example - Rock Generator - Geometry Nodes from Scratch - Blender Studio
Related Articles
Best Practices for Creating 3D Environments in Blender
Learn best practices for creating modular, efficient 3D environments in Blender with topology, LOD, and Geometry Nodes tips.
Realistic Hair Techniques in Blender: Guide to Particle Hair
Learn realistic hair techniques in Blender using particle systems, guide hairs, and grooming tools for natural, believable hairstyles.
Realistic Water in Blender
Learn the best techniques for creating realistic water in Blender using Ocean Modifier, fluid sims, and layered shading for stunning results.
Using Nodes for Shading in Blender: A Practical Guide
Learn how to use nodes for shading in Blender with tips on Principled BSDF, texture color spaces, and Cycles vs Eevee differences.