
Create a Character Rig in Blender: Step-by-Step Guide
Learn how to create a character rig in Blender with bone placement, weight painting, and testing for smooth animation.
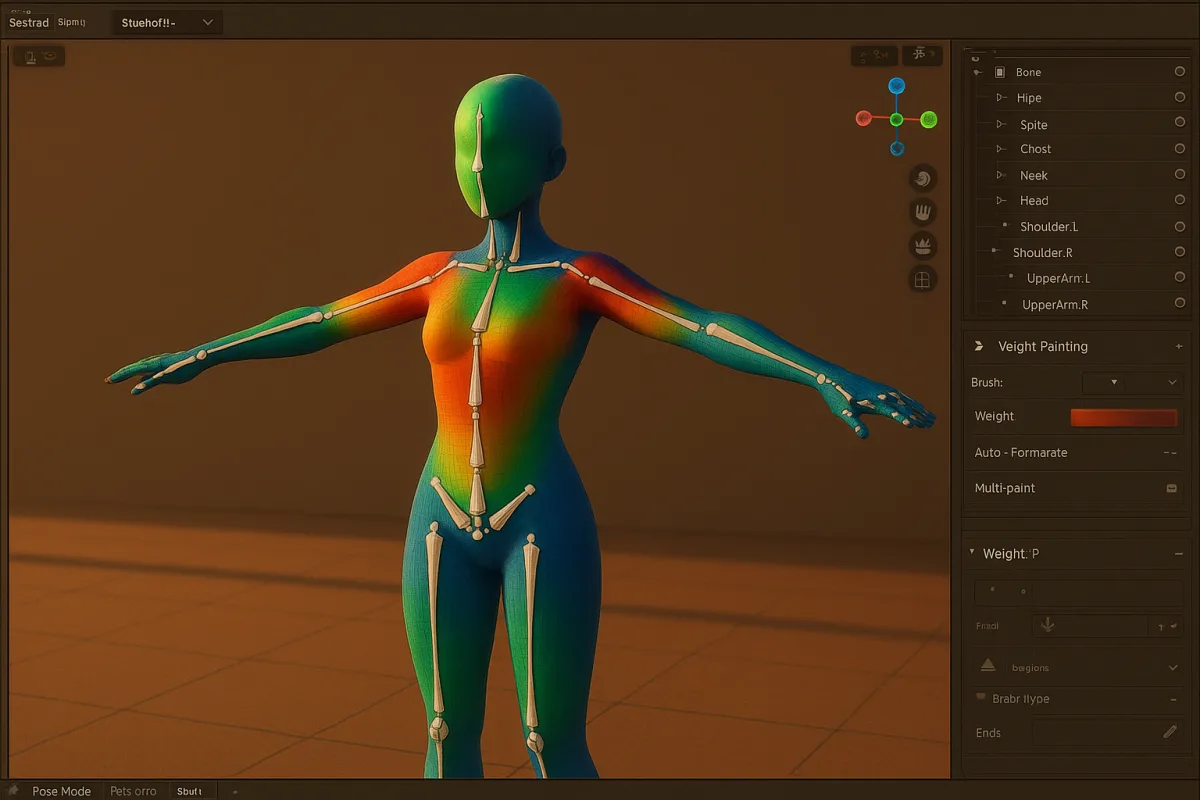
Start with a model that can actually bend
This guide uses Blender 4.5 LTS. The overall logic applies to older Blender releases, but armature tools, viewport behaviour, and hardware support change between versions, so check the version before following any interface-specific tutorial elsewhere. [8]
Rigging is the work of giving a mesh an animation skeleton, then deciding how every part of the surface follows that skeleton. A usable rig is not just bones inside a character. It is bone placement, hierarchy, weights, controls, and testing. [1][5]
The first problem is usually the mesh, not the armature. A character that looks good in a neutral render can still collapse when its elbow bends, because the loops around the joint do not provide enough surface to distribute deformation.
For a humanoid, begin from a T-pose or another symmetrical neutral pose with arms held away from the torso. This gives the armature room to sit through the shoulder and makes mirrored weighting and side-to-side comparison much less confusing. [1]
Apply the character’s object transforms before parenting it to an armature. Unapplied scale is a common source of confusing deformation and export problems, because the skeleton and mesh no longer agree cleanly about their size. [3]
Keep the topology purposeful around elbows, knees, shoulders, hips, fingers, and the mouth if it will animate. This is not a demand for perfectly even quads everywhere. It is a demand for enough controllable geometry where the body must compress and stretch.
Polygon budgets are a production choice, not a rigging law. Mobile hero characters often fall around 5,000 to 10,000 polygons, while console hero characters may reach roughly 80,000 to 200,000, depending on style, platform, materials, and runtime demands. [3][4]
Those figures do not mean more polygons automatically produce a better rig. A dense mesh can make weight painting slower and harder to inspect. A clean proxy body is often the better place to establish joints and test motion first.
Build a skeleton around movement, not just anatomy
Add an armature only after the mesh is in its neutral pose and its transforms are clean. The basic workflow is straightforward: create bones, align them to the character, parent the mesh, establish weights, and test poses. [1]
Start with the large structure: a root bone, pelvis, spine chain, neck, head, clavicles, arms, legs, hands, and feet. Do not begin by building facial controls, twist systems, or elaborate finger mechanics before the character can stand, walk, and lift an arm.
The root bone deserves deliberate attention. It is the broad control used to move the whole character through a scene, separate from the pelvis that drives the body. Missing or unclear root structure is a common beginner mistake and can complicate game export. [3][5]
Place the pelvis bone where it will make the hips rotate naturally, then run a readable spine chain upward through the torso. The point is not to trace every vertebra. It is to give the animator enough sections to create a convincing torso curve. [1]
Align limb bones through the functional center of each joint. An elbow bone that is visibly off-axis might still work in one pose, but it will encourage the forearm mesh to shear or twist when the character reaches more extreme positions.
Give knees and elbows a clear preferred direction in the neutral pose. A perfectly straight limb can make it harder to tell how the joint should resolve during posing. This is a practical setup habit, not an absolute anatomical rule.
Name bones while you create them. Blender’s documentation supports consistent side suffixes such as .L and .R, and that convention makes mirrored editing, later cleanup, and pipeline communication substantially safer. [11]
Use names that describe function rather than appearance: upper_arm.L, forearm.L, thigh.R, and shin.R communicate a hierarchy at a glance. A rig called Bone.001 through Bone.047 may technically animate, but it becomes costly to maintain.
Keep the parent-child relationships easy to read. The pelvis should lead the spine, the spine should lead clavicles and neck, and limbs should branch from sensible body regions. Clear hierarchy is specifically important for animation workflows and engine integration. [11]
Before skinning anything, pose the armature roughly. Rotate the spine, bend both knees, raise both arms, and turn the head. You are checking whether bone pivots and lengths describe the character’s movement before weights hide the underlying problem.
Parent the mesh, then expect to fix the result
Once the skeleton is sound, parent the character mesh to the armature using Blender’s automatic weighting as an initial assignment. It is fast and useful, especially for a first humanoid rig, but it is not a button that completes the job. [10]
Automatic Weights estimates which bones should influence nearby vertices. Its quality varies with topology, mesh complexity, intersecting parts, and how cleanly the bones sit inside the form. A simple body may get a workable start, while clothing, fingers, and shoulders often need correction. [10][12]
If automatic weighting fails outright, do not respond by randomly moving bones until it succeeds. Check for unapplied transforms, disconnected or overlapping geometry, extreme mesh density, and bones positioned outside the volume they should influence. [3][12]
A separate clothing mesh needs its own attention. It may inherit acceptable movement from the body initially, but tight sleeves, boots, gloves, belts, and layered garments can deform differently from skin. Test them as their own surfaces rather than assuming they are solved.
This is where weight painting becomes the actual craft. Each vertex can receive influence from one or more bones, and the painted distribution determines whether a joint bends as a gradual volume change or as a hard, accidental crease. [10][12]
Weight paint by posing the character
Weight paint one problem area at a time, then pose the corresponding bones immediately. Start with the large joints: shoulders, hips, elbows, knees, neck, and wrists. These areas reveal whether the mesh carries motion across the body in believable proportions.
At an elbow, the upper arm should not drag the forearm far down its length, and the forearm should not pull most of the bicep with it. The transition needs a controlled blend around the joint, not a sudden ownership change.
At a shoulder, inspect more than the arm. Raising an arm affects the upper torso, clavicle region, armpit, sleeve, and chest. If the shoulder collapses, the fix may involve several bone groups, not simply painting more weight to the upper arm.
Use strong diagnostic poses rather than small, polite rotations. Bend elbows sharply, bring knees toward a squat, lift arms overhead, rotate the torso, and turn the head. A rig that only survives subtle movement has not yet been tested for animation.
Weight painting takes time because every correction needs a new pose test. Beginner estimates commonly allow about 30 minutes for basic bone alignment but two or more hours for weighting and testing, even on a basic character. [6]
Do not interpret that estimate as a promise. Rigging time varies sharply with the character and the intended performance. Standard game-character rigs can take professionals one to two weeks, while hero characters with advanced facial setups may take three to six weeks. [6][7]
When a deformation still looks wrong, diagnose the cause before adding detail. The source may be poor topology, a bone pivot in the wrong place, incorrect relative weights, or a missing support bone. Painting around a structural error usually creates a more fragile rig.
Add constraints only when they solve an animation problem
After the deform skeleton works, add controls and constraints for actions an animator needs repeatedly. Blender constraints can limit movement, enforce relationships, and manage more complex bone behaviour, which is useful when direct rotation would be slow or inconsistent. [10]
A knee or elbow is a good candidate for controlled behaviour because it should generally bend in one intended direction. Constraints can stop accidental backward bending and make a pose more predictable, especially for a character that will be animated by several people. [10]
Keep the first control rig modest. A clean root, pelvis, spine, limbs, and dependable hand and foot behaviour will animate better than an ambitious pile of controls whose relationships you cannot debug. Complexity is justified only when it saves animation work.
Inverse kinematics can be useful for planted feet and hands, while forward kinematics can suit arcs such as arm swings. The exact choice depends on the shot and animation style, so do not treat either method as universally superior. The research brief supports constraints generally, not a single mandatory controller design. [10]
For facial animation, establish the body rig first. Advanced facial controls can add weeks to a hero-character schedule, and the brief does not support a one-size-fits-all Blender facial workflow. Plan facial work around the actual needs of dialogue, close-ups, and export targets. [7]
Test for the destination, not only Blender’s viewport
A character rig is not proven because it poses correctly in Blender. If it is going to Unity, Unreal Engine, a Vulkan-based glTF workflow, or another target, export a test early and inspect the skeleton, naming, root motion, and animation playback there. [3][11]
Consistent naming and hierarchy matter beyond tidiness. The Blender-to-Vulkan production guidance specifically identifies a clear root bone and predictable skeletal structure as useful for pipeline compatibility. Fixing this after dozens of animations exist is expensive. [11]
Export a short practical test: idle, walk, arm raise, crouch, and head turn. Those motions expose root problems, joint collapse, and scale issues more effectively than an elaborate single pose. It is also easier to isolate an export failure in a short clip.
Save versions as you progress. Keep a clean bind-pose file, a file after basic weighting, and another after controls. This is not glamorous studio procedure. It simply gives you a recoverable point when a constraint experiment or weight-paint pass goes sideways.
Keep the rig workable on your hardware
Blender 4.5 LTS needs reasonably modern graphics hardware, including NVIDIA GeForce 400-series-or-newer or AMD first-generation GCN-or-newer GPUs. New Blender releases improve tools, but they may be unsuitable for older systems. [8][13]
Rigging does not demand an RTX 4090 or a Ryzen 9 9950X3D, although high-end hardware can make dense scenes and heavy files more responsive. Limited RAM, older GPUs, and complex rigs are more likely to create slowdowns or crashes. [8][13]
When the scene becomes sluggish, reduce the problem before blaming the software. Work with a low-resolution proxy mesh, hide high-density clothing and accessories, limit viewport subdivision, and delay costly constraints until the core deformation is reliable. [8][13]
Reducing bone count and constraints can also be a valid production decision for games, mobile characters, or older hardware. The goal is not to build the most elaborate rig possible. It is to build a rig that animates well within its rendering and runtime limits. [3][13]
If Blender 4.5 LTS will not run reliably on the available machine, using an older compatible Blender version is a sensible workaround. Expect interface differences, and document the version with the project so collaborators do not unknowingly change rig behaviour. [8][13]
Frequently Asked Questions
How do I create a character rig in Blender from scratch?
Start with a character mesh in a neutral pose like a T-pose and apply all object transforms to avoid deformation issues. Add an armature aligned to the character’s anatomy, beginning with a root bone, pelvis, spine, limbs, and head. Parent the mesh to the armature, use Automatic Weights as a first pass, then manually refine weights through weight painting while repeatedly posing the character to test deformation. Finally, test and adjust the rig before adding advanced controls.
What are the best practices for bone placement in Blender rigging?
Place bones aligned through the functional center of each joint to avoid mesh shearing or twisting during animation. Give elbows and knees a slight bend in the neutral pose to clarify their preferred bending direction. Maintain a clear hierarchy starting from a root bone, pelvis, and spine chain, and use consistent naming conventions with suffixes like .L and .R for left and right bones to facilitate mirrored editing and game engine compatibility.
How to fix common weight painting issues in Blender character rigs?
Treat Blender’s Automatic Weights as an initial step, not a final solution. Manually refine weights by weight painting joints while posing the character in various positions to identify and correct deformation problems. Focus on areas around joints like elbows, knees, and shoulders, ensuring the mesh topology supports smooth bending and stretching without collapsing.
Why is a root bone important in Blender character rigs?
The root bone serves as the main control for moving the entire character independently from the pelvis or other bones. It provides a broad, stable base for animation and is essential for proper rig hierarchy and game engine export. Missing or unclear root bone structure is a common beginner mistake that can complicate animation workflows and integration.
How to test and refine a character rig in Blender before animation?
After creating the rig and applying initial weights, repeatedly pose the character in various positions to observe mesh deformation. Look for issues like collapsing geometry, unnatural bending, or twisting and adjust bone placement or weight painting accordingly. Start testing with a simple deform rig before adding complex controls to ensure the foundational rig works reliably.
How we researched this
This article was assembled from 13 cited references.
Nothing here is based on hands-on testing. Where a figure or finding appears, it belongs to the source cited beside it, and the writing says so rather than implying otherwise. Every source is listed below so you can check it.
Sources
- 3D Learn - Practical Basic Rigging
- Skeletal Rigging for Humanoid Characters in Blender: A…
- GamineAI - Build & Ship AI-Assisted Games, Fast
- Character rigging for video games: a production guide
- What Is 3D Rigging? Complete Game Dev Guide | MCO – MoCap Online
- How to Rig a Character in Blender: Complete 2026 Beginner Guide | StraySpark
- Rigging Outsourcing Guide: Partners & Process 2026
- Requirements — Blender
- 3D artists are so blown away by Blender's latest update, it's hard to believe it's free software
- Rigging | Blender Studio
- Blender-to-Vulkan Workflow :: Vulkan Documentation Project
- Blender Weight Painting: The 7 Problems Everyone Hits, How to Fix Them, and How to Skip the Step | Cinevva
- Hardware List - Blender Developer Documentation
Related Articles
Best Practices for Rigging in Blender
Learn best practices for rigging in Blender, including weight painting, topology, and normalization for smooth character deformation.
Blender Product Visualization Workflow for Realistic Renders
Learn a practical Blender product visualization workflow with lighting, rendering, and camera tips for photorealistic product renders.
Realistic Character Skin Shader Blender: Step-by-Step Guide
Learn how to create a realistic character skin shader in Blender using subsurface scattering, proper texture setup, and scale considerations.
Blender Ergonomics for Beginners: Safe Setup and Breaks
Learn Blender ergonomics for beginners with tips on posture, breaks, and workspace setup to work safely and comfortably.