
Realistic Hair Sculpting Techniques in Nomad Sculpt
Learn realistic hair sculpting in Nomad Sculpt with step-by-step techniques for volume, detailing, and brush use to create believable hair forms.
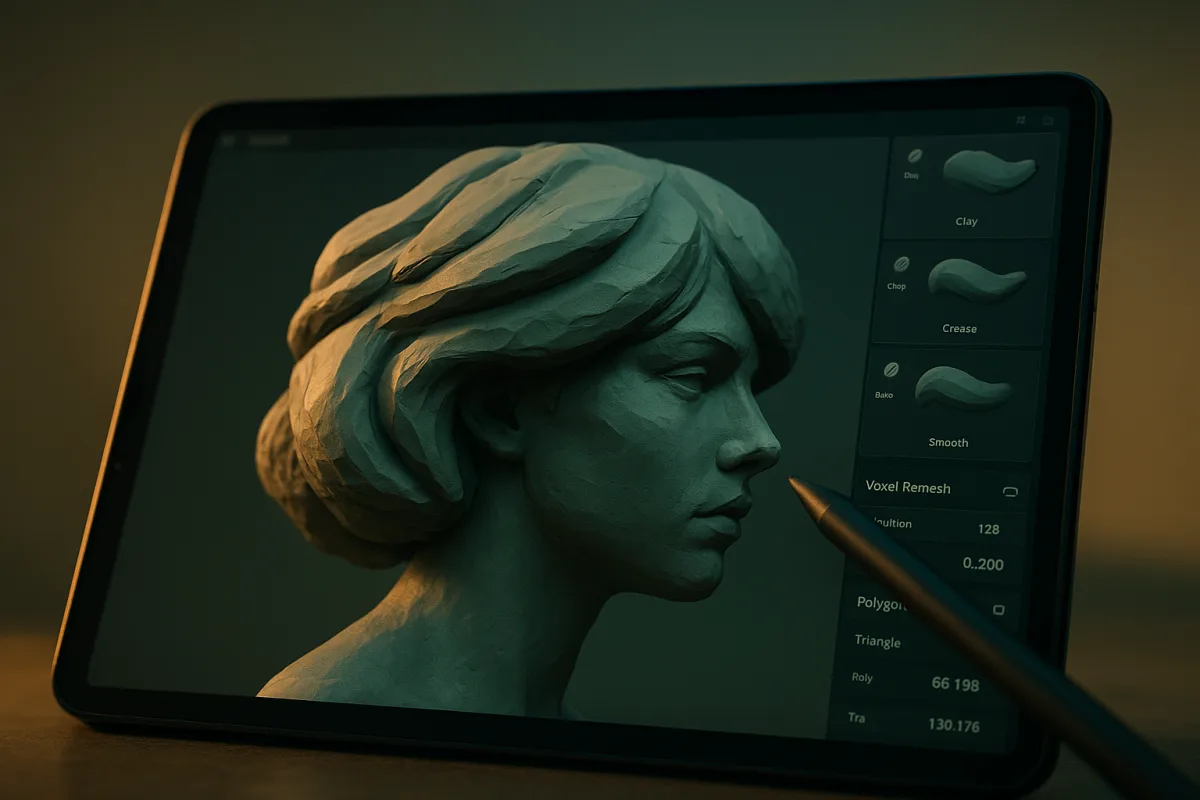
Decide what kind of hair you are sculpting
Before you open Nomad Sculpt, decide whether the hair needs to read as a carved hairstyle, a game-style hair mass, a portrait bust, or a close-up render asset. That choice controls how much strand detail the mesh can carry.
For a mobile sculpt, we would begin with hair as grouped forms. Realistic hair does not come from covering the head with equal grooves. It comes from volume, directional flow, changing clump size, and a clear relationship between the hair and skull.
Gather references that show the hairstyle from more than one angle. You need the hairline, crown, part, side profile, and back silhouette, because a style that works from the front can flatten or drift unnaturally around the head.
Look for the major forces in the reference: where hair parts, where it lifts from the scalp, where gravity pulls it down, and where it compresses against the neck or ear. Those forces should organize every later crease.
Block the scalp volume before adding strands
Start with a clean head and establish the scalp coverage as a single broad mass. The earliest pass should answer whether the hairstyle has enough height, width, weight, and separation from the skull to match the reference.
Use the Clay brush in Nomad Sculpt to build this base hair shape. Clay is the recommended starting tool because it lets you add volume gradually, without committing the surface to a final strand pattern too early. [1]
Work from large clumps toward smaller ones. A fringe, ponytail, bun, braid, side sweep, or curly crown should first read as several distinct volumes, not as hundreds of individual hairs.
Rotate the model constantly. Hair can look convincing under one viewport angle while revealing a flat cap from the side, a hollow crown from above, or an abrupt transition at the nape.
Build the silhouette before the surface. A strong outer contour will survive a simple material and modest lighting, while dense grooves cannot rescue hair that has the wrong mass or an implausible outline.
Set mesh density for the decision in front of you
Choose resolution according to the stage of the sculpt, not according to the maximum your device can briefly handle. Voxel remeshing gives the mesh a more uniform polygon distribution, which helps prevent uneven detail across the hair form. [3]
Use a voxel remesh resolution around 100 to 150 for rough blocking. At this stage, you are adjusting the hairstyle’s large volumes, so dense topology would only make broad corrections slower and less forgiving. [3]
Move toward 200 to 300 when you need clear clump boundaries, a hair part, overlapping locks, or compressed areas around the ears and neck. This range supports mid-level sculpting without demanding fine strand work everywhere. [3]
Reserve 400 or higher for places that need finely carved surface detail. A full head at that density can be expensive on a tablet, so apply it only after the silhouette, parting, and major clumps already work. [3]
Nomad Sculpt’s multi-resolution workflow lets you work at more than one detail level within one mesh. [2] Use lower levels for proportion changes and higher levels for surface refinement, so you do not destroy fine work while correcting the overall hairstyle.
Carve the direction of the hair
Once the hair mass reads from every major angle, use the Crease brush to establish directional channels between clumps. In Nomad Sculpt, Crease is the recommended tool for carving the flow and direction of strands. [1]
Start at the root or parting area, then pull creases toward the ends in paths that follow the reference. Do not make every channel equal in depth, width, or length, because uniform spacing creates a combed, synthetic surface.
A hair part needs special attention. It should divide the mass, reveal a restrained suggestion of scalp, and send the neighboring clumps in opposing directions without becoming a deep, sharp canyon.
Keep your first crease pass broad. You are describing grouped locks at this point, such as three or five channels across a larger clump, not trying to cut every visible strand into the mesh.
If the hairstyle includes curls, waves, or braids, establish the large directional rhythm before adding smaller ridges. The viewer should recognize the curl path or braided structure even when the model is viewed at a distance.
Add strand detail only where it earns its place
Use the Pinch brush after Crease has established the main hair organization. Pinch sharpens fine strand details, helping selected grooves and ridges catch light without requiring you to make the entire surface equally dense. [1]
Pinch the edges of chosen strand groups, especially near the hairline, along a part, at overlaps, and around a few exposed locks. Those areas often provide enough visual information for the viewer to accept the rest as hair.
We would skip an all-over fine-strand pass on a mobile sculpt. It consumes polygons, makes later reshaping difficult, and can turn the hairstyle into a noisy surface with no readable hierarchy.
Vary your detail density. Leave some clumps broad and quiet, add medium separations around them, then place a limited number of fine accents near focal areas such as the forehead, temple, or face-framing locks.
Dynamic topology can refine detail locally on hair strands. [3] Use it where a specific lock needs more definition, but avoid scattering localized density across the entire model unless the tablet can maintain responsive sculpting.
Build believable layers and clumps
Hair needs depth between its major masses. Build layers where the reference shows them: a top layer crossing over a lower layer, a fringe sitting forward of the scalp mass, or loose locks separating from a tied-back style.
This layered construction prevents the flat appearance that comes from treating hair as one shell. It also gives you natural locations for darker creases, softer transitions, and highlight-catching ridges once you begin material work.
Do not let every clump begin and end in the same way. Some should merge into the larger mass, some should split, and a few should lift away from the head to create air and irregularity.
Check the hairline with restraint. A repeated row of identical strand cuts creates an artificial edge, while a few uneven clumps and softer transitions can suggest density without forcing individual hairs into the sculpt.
Review the sculpture from multiple angles throughout this stage. Unnatural flow, weak clumping, and insufficient volume are common causes of unconvincing sculpted hair, and they are easier to correct before the detail pass. [3]
Paint the surface after the form is working
Vertex painting in Nomad Sculpt can add color, roughness, and metalness information to the hair surface. [1] Treat these controls as reinforcement for the sculpture, not a replacement for its clump structure and flow.
Begin with a restrained base color. Then use subtle variation between larger clumps, roots, and tips if the chosen reference calls for it. Strong random color variation can make the surface look painted instead of fibrous.
Adjust roughness to control how broad or tight the highlights appear. Hair needs readable highlights to show direction, but a uniformly glossy surface will make sculpted grooves resemble polished plastic.
Reflectance controls the strength of surface reflections. [5] Increase it carefully around the clump structure you want viewers to notice, while keeping enough roughness that the highlights follow the modeled flow instead of breaking into mirror-like patches.
Opacity can be adjusted to suggest hair-strand translucency. [5] Use that effect sparingly, because a solid sculpted hair mass still depends mainly on its silhouette, layered forms, and the shadowed separations between clumps.
Light the sculpt without exhausting the tablet
Use matcap lighting for the main sculpting session. Matcap mode is recommended for maintaining performance while still giving you shading that reveals the form of the hair mass and its carved channels. [5]
A neutral matcap helps you judge whether the clumps are readable without depending on dramatic environment lighting. If a hairstyle only works under a flattering HDRI, its shapes may still need correction.
HDRI environments can enhance reflections, especially on metallic materials. [5] Hair is not normally a metallic material, but an HDRI can still help you inspect how reflectance and roughness are shaping the highlight pattern.
Keep render multipliers lower while you sculpt on a mobile device. Lower settings and matcap mode reduce the risk of overheating and battery drain, leaving more performance for moving around a dense model. [5]
Inspect the hair under more than one lighting condition before you call it finished. A broad highlight should travel along the intended strand direction, while shadowed channels should support the clump design instead of appearing as evenly spaced scratches.
Control polygons before performance controls you
For detailed hair on mobile, aim to keep the sculpt between roughly 500,000 and 1 million polygons. This range is intended to preserve substantial detail while remaining manageable for tablet performance. [3]
That figure is a working target, not a guarantee. Device specifications, scene complexity, render settings, and the number of high-density regions can all change how responsive Nomad Sculpt feels during a session.
Use Decimate after the sculpt is complete or nearly complete if the polygon count has grown beyond what your device handles comfortably. Nomad Sculpt’s decimation function reduces polygon count without significant loss of detail. [3]
Save a version before decimating. You may need the denser mesh if a later revision requires changing the hairline, reshaping a curl, or adding a new layer that depends on the original surface detail.
Do not keep adding resolution to solve a form problem. If a lock has poor direction or a crown lacks volume, return to the broader mesh level and correct its shape there before increasing density again.
Finish with a focused realism check
At the end, inspect the hairstyle in this order: silhouette, scalp coverage, hair part, clump hierarchy, flow direction, overlap, and then fine strands. This sequence keeps you from mistaking dense detail for believable hair.
Ask whether the hairstyle has quiet areas. Real hair groups into masses, and a sculpt that gives every square inch the same crease density will look mechanically engraved even if the individual marks are clean.
Check the front, profiles, top, and back at the same scale a viewer will see in the final image. If the hairstyle only reads in extreme close-up, simplify selected grooves and strengthen the larger clump shapes.
There is no documented platform-specific difference in Nomad Sculpt hair tools between iOS and Android. Nomad Sculpt is available on both platforms, so use the same form-first workflow, then adapt mesh density and render settings to your device’s responsiveness. [6][7]
Brush settings for hair are not formally standardized in published Nomad Sculpt guidance. Start with Clay, Crease, and Pinch as the established workflow, then tune size and intensity against your reference and the mesh resolution in front of you. [1]
Frequently Asked Questions
How do I create realistic hair in Nomad Sculpt?
Start by blocking out the hair as large, layered masses to establish believable volume and clumping. Use reference images from multiple angles to understand hair flow, parts, and how gravity affects the style. Build the silhouette first with broad shapes before carving directional strands and adding finer details.
What brushes are best for hair sculpting in Nomad Sculpt?
Use the Clay brush to build the base hair volume and silhouette. The Crease brush is ideal for carving directional separations and flow between hair clumps. After the major strand groups are set, use the Pinch brush to sharpen and refine fine strand details.
How to block out hair volume before detailing in Nomad Sculpt?
Begin with a clean head and use the Clay brush to create a single broad mass that matches the hairstyle’s height, width, and separation from the skull. Work from large clumps to smaller ones, constantly rotating the model to check the silhouette from all angles before adding surface detail.
What voxel remesh settings work best for hair sculpting in Nomad Sculpt?
Use voxel remesh at 100 to 150 resolution for rough blocking of large volumes. Increase to 200 to 300 for mid-level detail like clump boundaries and hair parts. Reserve 400 or higher for fine strand carving only after the overall shape and flow are well established.
How to add strand detail to hair in Nomad Sculpt without slowing down performance?
Keep the polygon count between 500,000 and 1 million during detailed sculpting to balance detail and performance on mobile devices. Use multi-resolution sculpting to work on different detail levels without destroying fine work. After sculpting, decimate the mesh to reduce polygons and improve performance.
How we researched this
This article was assembled from 7 cited references.
Nothing here is based on hands-on testing. Where a figure or finding appears, it belongs to the source cited beside it, and the writing says so rather than implying otherwise. Every source is listed below so you can check it.
Sources
- Tools | Nomad
- Nomad Sculpt and Its Multi-Resolution Sculpting System
- How to Use Nomad Sculpt for 3D Printing: Beginner's Guide to Mobile Sculpting & STL Export on iPad and iPhone - Nozzle Down
- Nomad Sculpt: Pricing, Free Demo & Features | Software Finder
- Nomad Sculpt Lighting Guide: How to Light 3D Art on iPad, Nebenzu
- Nomad Sculpt - Apps on Google Play
- Nomad Sculpt App - App Store
Related Articles
Blender vs Nomad Sculpt for Beginners: Which to Choose?
Compare Blender 4.5 LTS and Nomad Sculpt to find the best 3D sculpting app for beginners based on workflow, hardware, and learning goals.
Sculpting Software for Beginners: Blender vs Nomad Sculpt
Learn how to choose the right sculpting software for beginners by comparing Blender and Nomad Sculpt features, ease of use, and workflow fit.
Realistic Water in Blender
Learn the best techniques for creating realistic water in Blender using Ocean Modifier, fluid sims, and layered shading for stunning results.
Realistic Hair Techniques in Blender: Guide to Particle Hair
Learn realistic hair techniques in Blender using particle systems, guide hairs, and grooming tools for natural, believable hairstyles.